When creating workflows, did you know that you can use object alignment guides to make your workflows look all tidy? No more misaligned objects!
Hold the Option key to temporarily show vertical and horizontal guide lines around the object you're hovering over on the Workflows canvas. It makes it easier to work out whether your object is neatly lined up with neighbouring objects.
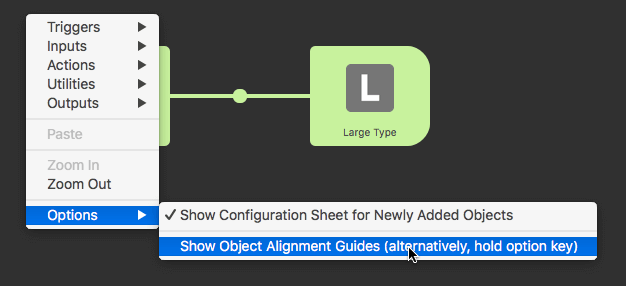
If you prefer to turn the alignment guides on to be visible without holding Option, right-click the canvas to reveal the Objects list. Choose Options > Show Object Alignment Guides, and the lines will now appear any time you hover over any workflow objects on the canvas.
 It's fascinating and insightful to take a look at how long-time Alfred users create workflows to speed up repetitive tasks, make their workload easier to manage, or simply make work more fun.
Matthew Guay is Senior Editor and Writer at Zapier, and an Alfred user since version 1 was first released. In this post, he shares how he uses Alfred and Zapier together to control web-based services - even when they don't have a Mac app!
The first app I use most days is Alfred, typically to open my favorite apps and sites to start work. I'll absentmindedly hit alt + space dozens of times a day whenever I need to open a new app, Google something, or even to quit an app and put the computer to sleep for the day.
I have an Alfred command to open a plain text scratchpad for quick notes. While writing, Alfred's snippets save me a crazy amount of repetitive typing — and its calculator gets used more than I'd like to admit.
Those core features are the main reason I use Alfred, the things that make demo Macs at the Apple Store almost feel broken without Alfred.
The most fun part of Alfred, though, are its workflows. The Evernote and Ulysses workflows are handy for searching through my (far too messy) notes and writing drafts, and a blogging workflow I built lets me kick off a new blog post complete with a template outline in a keystroke. Another lets me append text to my log of what I've done each day.
They're powerful — and are some of the best reasons to use native Mac apps over web services, since they're easier to automate with Alfred.
But some of today's best apps — Gmail, Airtable, Slack, Clearbit, Trello, and more — are best as web apps. Sure, they have Mac apps, but they're basically web apps wrapped in a Mac UI — not something you can easily control with Alfred. And those are the apps you're most likely to use at work — your CMS, CRM, eCommerce tools, HR apps, and more are likely web apps.

So, I put Zapier and Alfred together in a simple new workflow; Zapier is a web app automation tool — much like Alfred, for the web. It connects 750+ apps so you can build workflows to automatically move data between apps, find data in your web apps, and do work automatically. And Alfred does that for the Mac, letting you automate work from your keyboard.
Put the two together, and you can enter text into the Zapier for Alfred workflow and send it to web apps to do anything you want without opening your browser.

For instance, I needed to look up a contact's email address from my address book, or someone new's email from Clearbit, and start a draft email to them. So I type their name in Alfred, and seconds later, Zapier finds their email and company info from the CRM, starts a draft Gmail email to them, and notifies me via Pushbullet. I can then open Mail on my Mac and finish the draft email.
Of course, you can just use it for simple workflows; A colleague keeps a gift idea list in Airtable via Alfred, and I now save completed tasks to I Done This right from Alfred.
It's helped me use Alfred more, with the apps that I'm increasingly using at work. Everything doesn't have a Mac app — but now, I can still automate them with Alfred.
Want to find out more about Matthew's Zapier for Alfred workflow? Take a look at his detailed blog post on setting it up, where you can also download the workflow.
To use Workflows, Snippets, Clipboard History and other advanced features, you'll need a Powerpack license; Purchase a new license or upgrade your Alfred 1 or 2 license to get started!
Alfred 3.4 is a stunning release; It's so feature-filled, that it's challenging to summarise all the new additions in one blog post! We're sharing a few exciting highlights today, and will post tips and guides for using the new features over the next week or two.
The core of this release focuses on improvements to snippets and clipboard-related features. It includes date arithmetic, collection-wide prefixes and suffixes, improved batch editing of snippets, but this barely scratches the surface of what's new!
You'll also find a new Snippet Trigger object available for Workflows, which essentially means that you can now harness the power of a workflow within an auto expanding snippet.
You can grab Alfred 3.4 right now by updating in-app from the Update tab, or by downloading it from alfredapp.com.
Snippets and Text Expansion Improvements
A fun feature to get started with is the newly added date arithmetic for snippets and workflow objects, which means you can now include date and time calculations when processing text in Alfred.
As a very simple example, to paste tomorrow's date, your snippet would include {date +1d}.
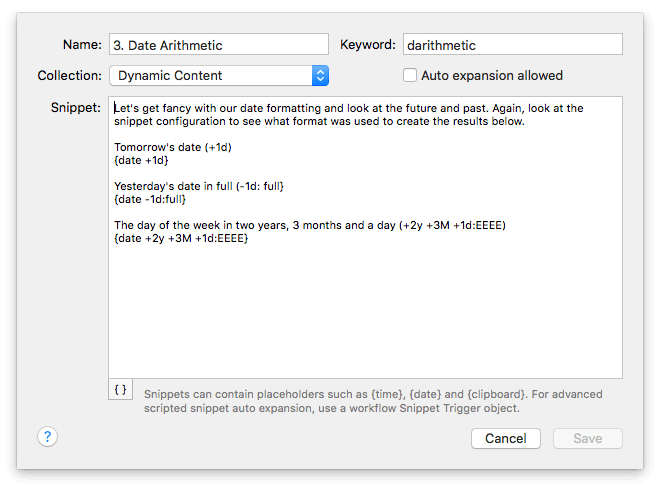
To help you get started, you'll also find placeholder templates for date, time, clipboard content, arithmetic and more by clicking on the curly brackets at the bottom left of snippet and clipboard windows.
This release also adds the ability to set affixes for a snippet collection; Specify a unique character or a few as prefix (at the beginning) or suffix (at the end) to set it for the whole collection.
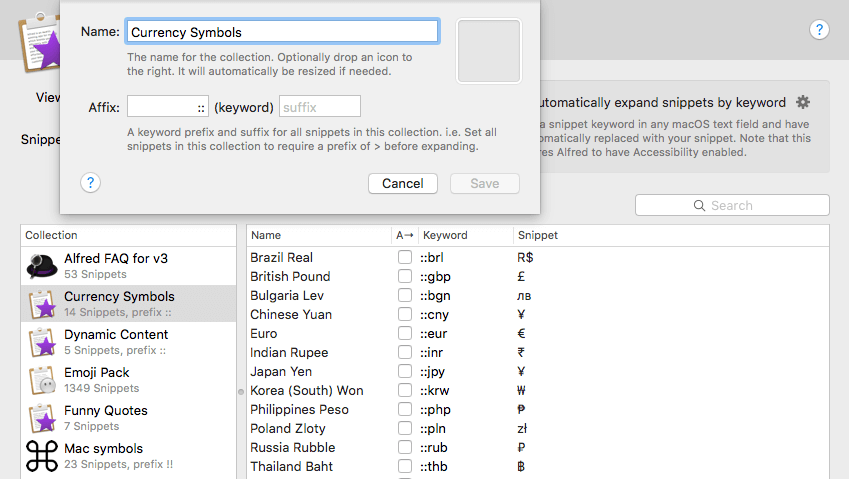
In this example, I've set :: as my prefix, so all keywords in that collection will automatically begin with these two colon punctuation marks.
You can also now batch enable and disable text expansion for snippets within a collection, or enable/disable entire snippet collections.
Beyond this, there have been under-the-hood improvements to give you the smoothest experience possible with snippets and clipboard features.
New Workflow Snippet Trigger Object
Along the same theme, we've added a new object to Workflows; the Snippet Trigger object.
The Snippet Trigger brings the power of Alfred's workflows to the text expansion feature; In other words, Alfred's text expansion can now be scripted and dynamic, making them more flexible than ever.
For example, you could use it to run a script that adds "Good morning!", "Good afternoon!" or "Good evening!" to a snippet before pasting, based on the time of day. You could also use it to run a script to include a random quote from a pre-established list before pasting your snippet.
Many more improvements and fixes
As well as these new features, many aspects of workflows, as well as the File System and iTunes, have seen some improvements in this release, so dig into the full change log for all the details.
Did you know that Alfred can remember queries you've recently typed?
Once you've enabled this feature, you'll have access to the latest 20 queries you've typed in Alfred by pressing the up arrow. You can even have the most recently typed query automatically populated when you reshow Alfred within 5 minutes.
This is particularly convenient if, for example, you're making a calculation that requires a few numbers from different sources.
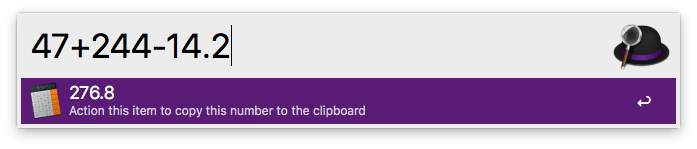
Type the first few numbers, go back to your other application, then pop up Alfred again to carry on with your calculation.
You can enable this feature in Alfred's Advanced preferences:

Simple and practical! :)
Alfred excels at speeding up repetitive tasks and making laborious jobs easier; Whether it's formatting text on the fly or manipulating text for convenience, a quick workflow is all it takes!
We'll take a look at two examples in this post: In the first one, we'll grab the selected text in macOS and paste it as plain text. In the second one, we'll copy a selection and replace part of it before replacing the original text.
The examples in this post are created using 2 or 3 objects, and no scripting or coding is required. You can download the workflow to take a closer look as we go through the examples.
Bringing selected text into a workflow
Before we can manipulate the selected text in macOS, we need to bring it into a workflow.
This is a simple task with the Hotkey trigger object (in yellow, in the screenshot below), using its Argument option, which passes the selection into the workflow as plain text.
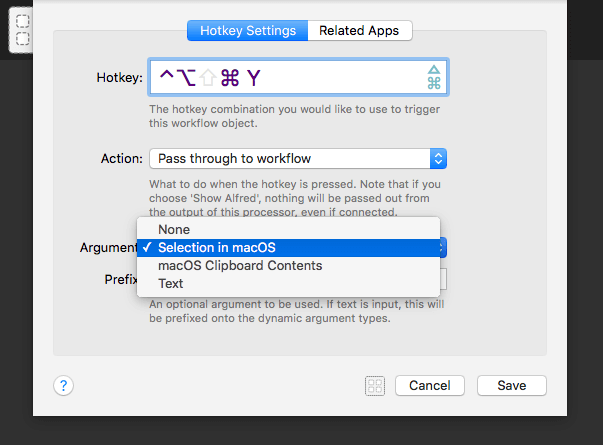
We now have the selected text in macOS coming into our workflow. For this to be useful, we need to get it back out of the workflow.
There are multiple ways to do this, but we'll use the Copy to Clipboard output object (in green) here, as this allows direct manipulation and replacement of the selected text when using the hotkey.
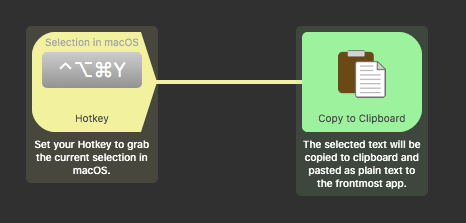
This gives us a very basic, but already useful workflow, which takes the current selection in macOS and places a plain text copy of it into the clipboard.
We can take this one step further; By selecting the "Automatically paste to frontmost app" option in the Copy to Clipboard configuration, the selected text in macOS will automatically be replaced when you use the hotkey.
This can be particularly useful when a work colleague sends you a document filled with terrible formatting. Let's work a little magic on it by using our hotkey to turn it to plain text.
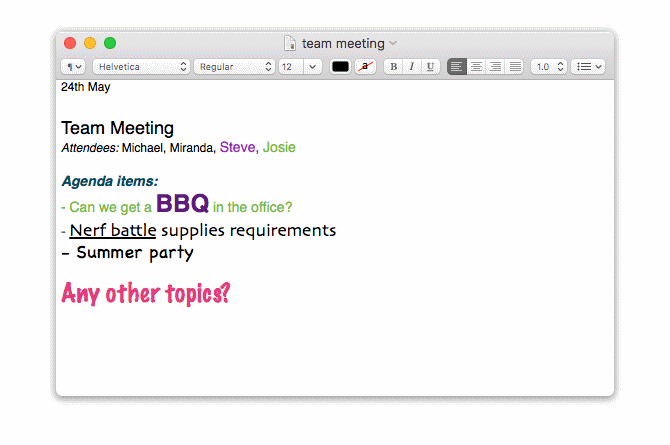
That's much easier to read!
More advanced processing
What else can we do once we have an input and an output? We can process the selected text further to perform a particular task, like replacing part of the copied text string before pasting it.
Let's create a workflow just like the one above, with the Hotkey and Copy to Clipboard object, and let's add a Replace utility object (in pink) between them.
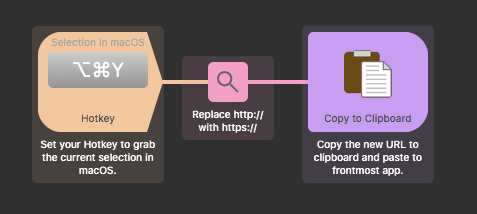
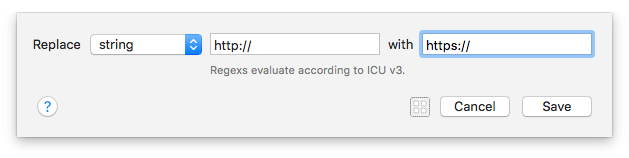
The Replace utility is configured to simply replace http:// with https://, ensuring we're visiting websites more securely.
Now, when I select a URL in my browser's address bar and press the hotkey combination, the http:// part of the URL is automatically replaced with https://. The new string is then pasted, replacing the original one, and pressing Enter launches the new URL.
Endless possibilities with workflows
These are two of the simplest examples illustrating how you can manipulate selected text with a workflow.
Now that you understand how to use an input and an output, you can process your macOS selection in more advanced ways, either with Alfred's built-in objects or using your own scripts to work with the text you've selected.
Using a workflow for repetitive tasks not only saves you manual typing, but also gives you consistency with the knowledge that you haven't missed a quote or made a typo error. Get it right the first time, every time!
Think about your own daily tasks and see how you can simplify them with workflows. And of course, take a look at our Guides and Tutorials to help you discover workflows and more.