Did you know that Alfred can remember queries you've recently typed?
Once you've enabled this feature, you'll have access to the latest 20 queries you've typed in Alfred by pressing the up arrow. You can even have the most recently typed query automatically populated when you reshow Alfred within 5 minutes.
This is particularly convenient if, for example, you're making a calculation that requires a few numbers from different sources.
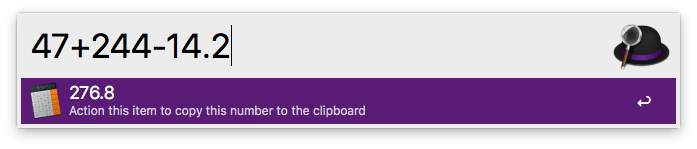
Type the first few numbers, go back to your other application, then pop up Alfred again to carry on with your calculation.
You can enable this feature in Alfred's Advanced preferences:

Simple and practical! :)
Alfred excels at speeding up repetitive tasks and making laborious jobs easier; Whether it's formatting text on the fly or manipulating text for convenience, a quick workflow is all it takes!
We'll take a look at two examples in this post: In the first one, we'll grab the selected text in macOS and paste it as plain text. In the second one, we'll copy a selection and replace part of it before replacing the original text.
The examples in this post are created using 2 or 3 objects, and no scripting or coding is required. You can download the workflow to take a closer look as we go through the examples.
Bringing selected text into a workflow
Before we can manipulate the selected text in macOS, we need to bring it into a workflow.
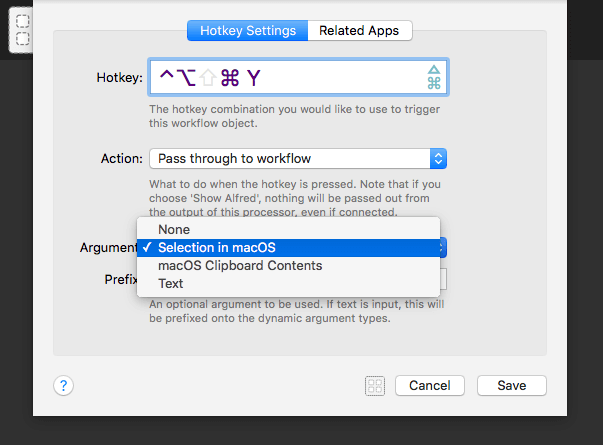
This is a simple task with the Hotkey trigger object (in yellow, in the screenshot below), using its Argument option, which passes the selection into the workflow as plain text.
We now have the selected text in macOS coming into our workflow. For this to be useful, we need to get it back out of the workflow.
There are multiple ways to do this, but we'll use the Copy to Clipboard output object (in green) here, as this allows direct manipulation and replacement of the selected text when using the hotkey.
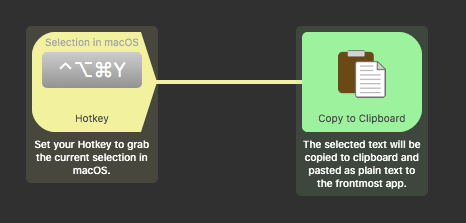
This gives us a very basic, but already useful workflow, which takes the current selection in macOS and places a plain text copy of it into the clipboard.
We can take this one step further; By selecting the "Automatically paste to frontmost app" option in the Copy to Clipboard configuration, the selected text in macOS will automatically be replaced when you use the hotkey.
This can be particularly useful when a work colleague sends you a document filled with terrible formatting. Let's work a little magic on it by using our hotkey to turn it to plain text.
That's much easier to read!
More advanced processing
What else can we do once we have an input and an output? We can process the selected text further to perform a particular task, like replacing part of the copied text string before pasting it.
Let's create a workflow just like the one above, with the Hotkey and Copy to Clipboard object, and let's add a Replace utility object (in pink) between them.
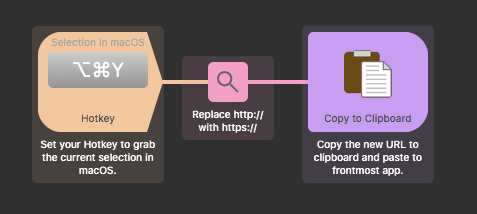
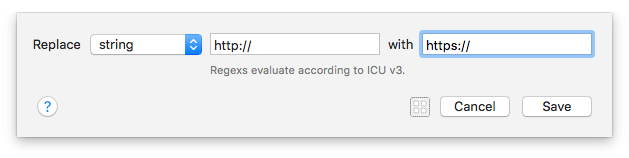
The Replace utility is configured to simply replace http:// with https://, ensuring we're visiting websites more securely.
Now, when I select a URL in my browser's address bar and press the hotkey combination, the http:// part of the URL is automatically replaced with https://. The new string is then pasted, replacing the original one, and pressing Enter launches the new URL.
Endless possibilities with workflows
These are two of the simplest examples illustrating how you can manipulate selected text with a workflow.
Now that you understand how to use an input and an output, you can process your macOS selection in more advanced ways, either with Alfred's built-in objects or using your own scripts to work with the text you've selected.
Using a workflow for repetitive tasks not only saves you manual typing, but also gives you consistency with the knowledge that you haven't missed a quote or made a typo error. Get it right the first time, every time!
Think about your own daily tasks and see how you can simplify them with workflows. And of course, take a look at our Guides and Tutorials to help you discover workflows and more.
When you find a file in Alfred or in Finder, it's easy to take action on it; Email it, copy it, reveal it in Finder, or even create your own custom action.
You'll need a Powerpack license to take advantage of the File Actions feature. Discover all the amazing things you can do with the Powerpack.
Showing the File Actions list
Accessing File Actions couldn't be easier:
- Found your file in Alfred? Press the right arrow to reveal the File Actions panel
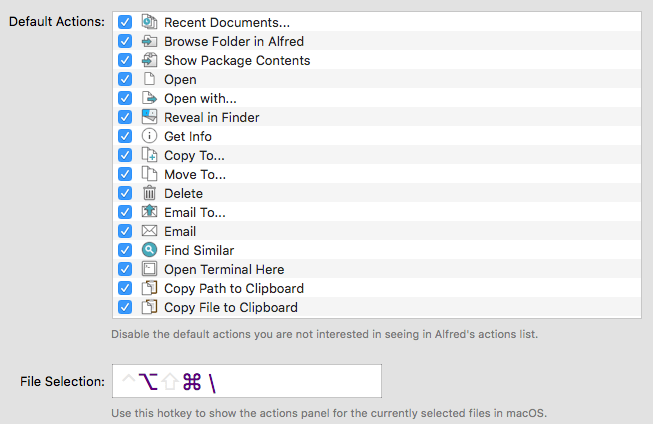
- Selected a file in Finder? Use Cmd + Alt + \ to pop up File Actions
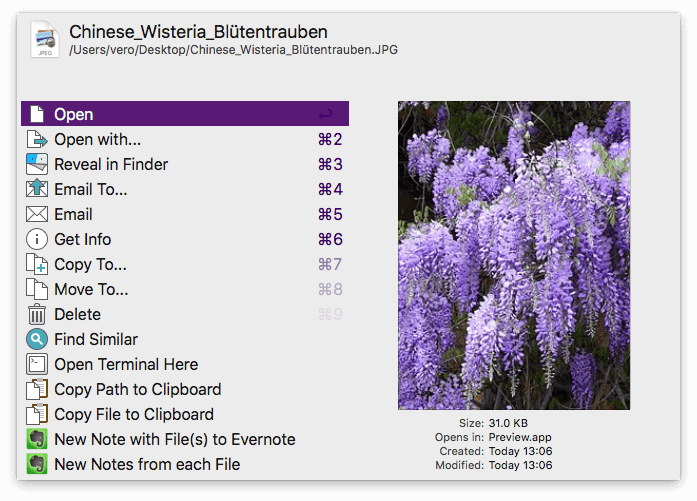
The File Actions panel will appear, where you can quickly choose the action you'd like to perform on your file or files. Hit Return and you're done!
Alfred will show the relevant actions, ensuring you only see actions that can be used on the file type(s) you've selected. You can see the full list of default actions in the preferences under Features > File Search > Actions.
Selecting multiple files
Need to take action on multiple files at once? No problem!
In Finder, simply select the files and use the Cmd + Alt + \ hotkey to see the actions relevant to those file types.
In Alfred, use the File Buffer feature to add files to your buffer with Alt + up arrow. Once you see all the files you need nestled at the top of your Alfred window, use Alt + right arrow to see the actions available for these files.

Creating custom actions
You may have noticed in the screenshot at the top that there are a few actions that aren't defaults; The two Evernote actions, in this case.
These are created using Alfred's incredibly flexible workflows, which give you a way to create actions specific to your needs. Custom file actions can be as simple as moving a file to a fixed location (e.g. your Dropbox folder) or can use a script to perform an action; saving the file to Evernote, in this example.
To do this, your workflow will need to include a File Action trigger object, which lets Alfred know that you want this action to be available in the list of File Actions for relevant file types.
As with every workflow object, you can learn about File Action Triggers on our help site.
Have you ever noticed the subtle change in the subtext of a result in Alfred when you type a search term and press the Ctrl, Alt or Cmd key?
Action modifiers are tiny superpowers hidden in plain sight, so let's take a look at how you can use them.
Imagine that I want to search online for information about the GitHub code repository; I'll type "github" into Alfred... but the GitHub Desktop app that's installed on my Mac appears as a matching result.

How can I quickly search the web for my keyword? Should I delete all characters and re-type it as "google github"?
There's no need; Hidden under the Ctrl modifier hotkey is quick access to my default search engine!
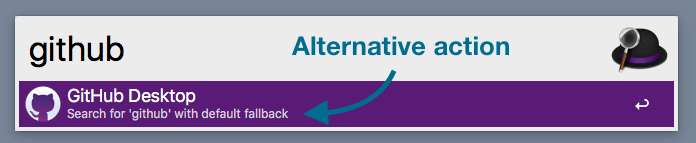
Holding the Ctrl key shows "Search for 'github' with default fallback" as subtext, so I can press Enter to perform this alternative action on my result.
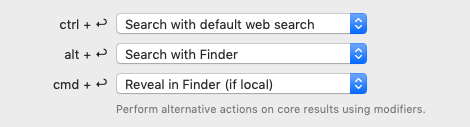
The action modifiers are:
- Ctrl + Return to search with the default web search (Google, or any alternative you've set as your top Fallback Search)
- Alt + Return to search with Spotlight
- Cmd + Return to reveal the result in Finder, if it's a local result such as a file or app
You can change these in Alfred's Advanced Preferences, where you'll find a few more possible actions in the dropdown menus.
Next time you start searching for a keyword that happens to match local files when you need to search the web, remember to hold Ctrl and press Return. Another convenient time saver! :)
Seven years ago, we released the very first build of Alfred - version 0.4 - while watching a Canada vs USA hockey game on TV, during the Vancouver Olympics. We watched with bated breath as friends, then strangers, shared the link far and wide, excited to discover Alfred. Before we knew it, we had our first 30,000 downloads!
Since 2010, Alfred has evolved so much, reaching millions of users, but has remained true to our original goal of being a slick, efficient productivity app to help you get more done on your Mac.
To mark Alfred's 7th birthday, we've set up a shop of Alfred-themed goodies; T-shirts, stickers, notebooks, phone cases, travel mugs and more, so that you can adorn your Mac (or yourself) with our iconic bowler hat!

Finally, we want to say thank you, whether you've been here since the first Alfred 0.4 beta or have recently joined in.
Want to celebrate with us? Take a moment to share your favourite Alfred tricks with friends or colleagues, and encourage them to grab the Powerpack to make the most of the fantastic Alfred 3 features.
We have an exciting year ahead, filled with amazing plans for Alfred; Be sure to stay in touch on Twitter or Facebook to be the first to hear about what we're up to!
Cheers,
Andrew & Vero