
Note: While this promotion is now over, you can still upgrade to v2 or buy a new v2 license and get a free upgrade to version 3 when it becomes available!
Over the past six years, Alfred has made millions of people more productive on their Mac.
Today is Alfred's birthday, and this week, we're offering you a 10% discount (This promotion is now over) on the Powerpack! We'll be celebrating all week with giveaways and exciting news, so stay tuned.
Be sure to follow us on Twitter at @alfredapp, and sign up to our newsletter in-app or in our website footer if you don't want to miss anything this week.
Grab your Powerpack license by Friday 4th March, 2016, to take advantage of the birthday discount - We're applying the discount to all new purchases at checkout, so no need for codes.
Don't forget to share the love with your friends, so that they can boost their productivity too! :)
Yesterday, we released Alfred 2.8.2, which includes improvements to Alfred's integration with the 1Password password manager, as well as general improvements to Alfred.
You can update to 2.8.2 from Alfred's Update preferences or by downloading it directly from alfredapp.com.
In line with 1Password 6's release yesterday, Alfred 2.8.2 brings a few compatibility improvements to make the two apps work together even more smoothly than before.
Additionally, if a 1Password bookmark is missing the http:// or https:// at the beginning of the URL, Alfred will complete it to allow your default web browser to launch the bookmark.
And finally, we now show the 1Password data path in Alfred's advanced preferences when discovering data automatically, which makes it easier to identify which library Alfred is using.
We've also fixed a few bugs and made a few more improvements within Alfred itself; You can see the full release notes in the change log.
Got a friend or family member who's new to Mac? If you've been looking for an introduction to Alfred, this is the perfect Alfred 101 Guide to get you started!
Each step below is short and simple, with a link to more details on our support site so you can dig a little deeper when you find features you're curious about.
First, why use Alfred?
Usually, when using your Mac, you'll find yourself switching from keyboard to mouse, back and forth, in order to launch applications and websites, or find a file nested in some subfolder of your Documents.
Alfred is your clever helper, waiting in your menu bar for you to call him up without lifting a finger off the keyboard. Using a hotkey, you can bring up the Alfred input window and tell him what you're looking for; an app on your Mac, a web search online or a system command like ejecting a drive. He'll then speedily locate it for you, saving you the manual labour.
How do I launch Alfred?
You'll see the bowler hat in your menu bar at the top of your screen. To summon Alfred, the default hotkey is Alt + Space, but you can change it if you wish.
How do I search my Mac?
There are a few ways to get started, depending on what you want to do:
1. Launch an application
Easy peasy! Pop up Alfred and type the name of the application you want to launch. Keep typing until the app comes to the top of the list, or use the arrows on your keyboard to pick it. Press return to launch the application you selected.

2. Finding a document or image
As there are many more files and images on your Mac than applications, Alfred searches for these in a slightly different way, which ensures that the files don't clutter your search for apps.
To open a file, type "open" followed by the name of your file. You'll see all the relevant results, and you may need to scroll down if there are a lot of results - Just use the arrows to keep navigating down the list. Press Enter to launch your file.
You can also press the spacebar for the same action as the "open" keyword. It's quicker and shorter.
There are two other useful keywords; "find" will reveal the file in Finder instead of launching it and "in" will let you search for the content of files, such as text in a document.
Learn more about File Search.
How can I search the web?
Now that you've mastered searching on your Mac, it's time to try searching the web.
A little tip before you start
Under Alfred's General preferences, you can specify your geographical location; This will help Alfred present you with the most relevant version of a website, such as your local Google results.
1. Use Alfred's default web searches
We've included a wide range of popular web searches - Google, Wikipedia, Maps and many more - to help you find what you want quickly. To see the full list of default web searches and their respective keywords, take a look at Alfred's Features > Web Search preferences.

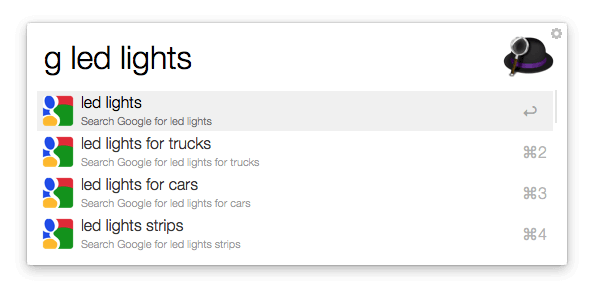
To use a default web search, simply type the keyword for it followed by your search term. Alfred will launch your default web browser with the results page for the search term you entered.
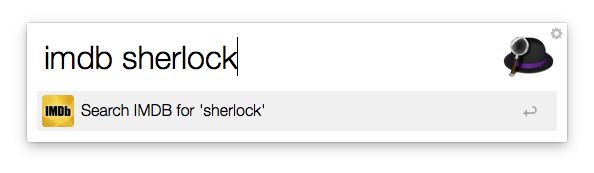
For example, I can search the Internet Movie Database (IMDb) by using its keyword followed by my search term:
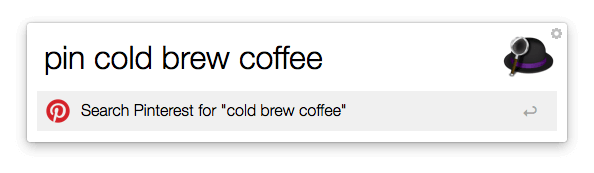
2. Create your own custom searches
Beyond the default searches we've provided you with, you can learn to create your very own custom searches for websites you use regularly. In our example, I created a useful custom search for the Pinterest website.
Fallback searches are so convenient!
By now, you've probably noticed what happens when you type a search term in Alfred and there are no local results; Alfred shows you a few fallback searches, so that you can just hit the Return key and launch a web search.
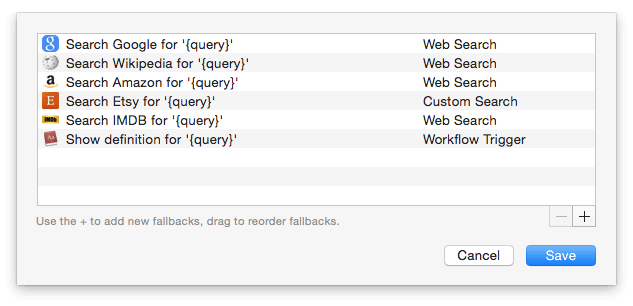
The default fallback searches are Google, Wikipedia and Amazon, which are popular web searches. However, Powerpack users can customise these to use any combination of web searches, custom searches and workflows.
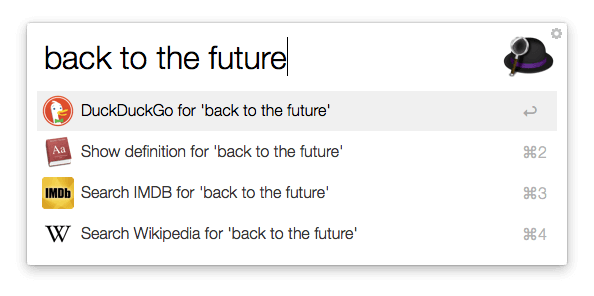
I've opted for DuckDuckGo as my first fallback search, followed by the OS X Dictionary app, IMDb and Wikipedia. What are your favourite fallback searches?
Learn how to customise Alfred's fallback searches to give you the results you want.
Discover more of Alfred's features, as well as the Powerpack, and boost your daily productivity!
Today, we released Alfred 2.8.1, which includes compatibility improvements for Apple's OS X 10.11, El Capitan.
You can update to 2.8.1 from Alfred's Update preferences or by downloading it directly from alfredapp.com.
Alfred themes can now use the System font and the System Light font, which means Powerpack users can create lovely themes that feel native to El Capitan using Apple's new San Francisco font.
The release also includes a number of bug fixes and performance improvements to Alfred's existing features, to give you the best and smoothest experience possible. Take a look at the full changelog for details.
It's easy to search the web using Alfred, with web searches, custom searches, workflows and more. In this post, you'll find 5 ways to the information you want even more efficiently!
Open a URL
To open a URL in your browser, you can paste or type it into Alfred and press return. Alfred will recognise that it's a URL even if you forget to start with http://, and he'll launch the URL in your default browser.
Powerpack users can also choose to store their URL history, so that Alfred suggests possible URLs next time you start typing a previously used URL.
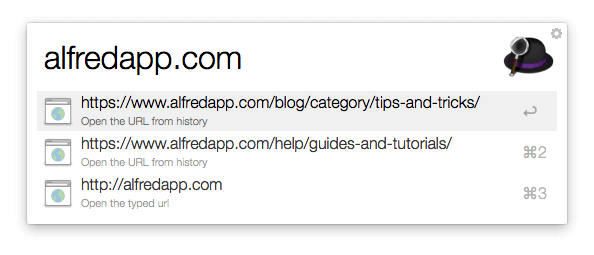
Take a look at your own URL history in the Features > Web Search > URL History preferences or take a look at the URL History feature page.
Create great custom searches
We've included a range of helpful web searches to Alfred, and you've no doubt created a few of your own custom searches. Why not take a look at your most-used ones and see how you can improve them?
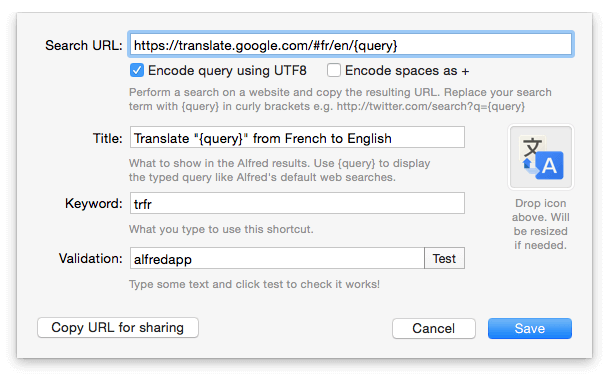
For example, I use Google Translate to translate from and to many different languages, so using the keyword "translate" in Alfred results in Google taking its best guess at which language I'm pasting in, and which one I want it to translate to.
Instead of letting Google play Russian roulette, I've added a few custom searches that specify which languages I want Google to use. This particular custom search ensures that Google knows I'm entering a French word and I want the outcome to be in English. Predictable and simple!
Pick your own fallback searches
If you prefer using an alternative search engine to Google for fallback searches, you can modify your fallback search engines with the Powerpack. For example, many users like to use DuckDuckGo as their top fallback search.
You can set this up in Alfred's Default Results under the "Setup fallback results" button. Find out more about creating your own Fallback searches.
Skip local results, search online
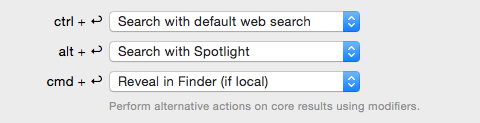
Let's say you want to search for information about the 1Password app on the web, but it's installed on your Mac so when you type "1password" in Alfred, you're presented with the app as a local result. What's the quickest way to search the web instead?
Hold the Ctrl key and press return, which will search using your default web search. The subtext will change to let you know what the action modifier does; you can customise these action modifiers in Alfred's Advanced preferences.
Try out the Google Suggest workflow
Did you know that we include a few example workflows in Alfred to get you started? To add these, launch Alfred's Workflows preferences and click on the + button in the bottom left. You'll see a list that includes "Examples"; Choose any of these to add them to your list of workflows.
These examples also show you how you can create your own workflows, from simple keyword-based searches and file filters to advanced workflows with in-line results like Google Suggest.
You can also take a look at our favourite workflows for more ideas of what you can achieve with workflows.