Alfred includes a brilliant range of features, between the free version and the Powerpack. To help you discover (or re-discover) them, we've created this collection of tips and tricks.
Did you know that Alfred's Dictionary feature includes two keywords to help you broaden your vocabulary when writing?
Defining a word
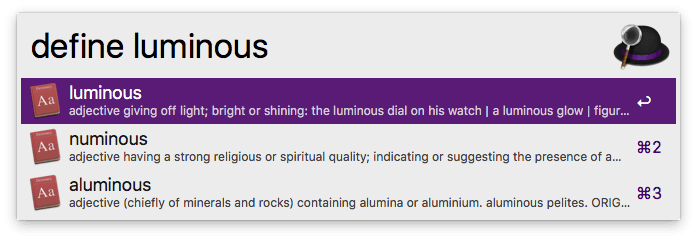
First, the "define" keyword will show in-line a brief definition of the word you're searching for. Press the Return key to pop up the Dictionary with a more complete definition if necessary.
If you're looking to expand your lexicon with synonyms, choose the Thesaurus the first time you launch the Dictionary app, and Alfred will ensure it's launched to the same tab next time.

Checking spelling
Secondly, the "spell" keyword helps you check the spelling of a word, showing you the correct spelling in-line. Pressing Return copies the correct spelling to your clipboard.

Under Features > Dictionary, you can choose to automatically paste the correctly spelled word to the frontmost application to save time.
May your future literary oeuvres be erudite and scholarly! ;)
Don't forget to take a look at past tips & tricks for more Alfred features you may not have discovered yet!
Today, we've released Alfred 3.7.1, which includes improvements for macOS Mojave support.
If you're using macOS Mojave, we recommend updating to this release as soon as possible for the smoothest experience. (It's also worth checking that you're on the latest public Mojave update from Apple!)
You can update to 3.7.1 by clicking on Alfred's bowler hat in the menu bar and choosing "Check for updates..." or by downloading the latest version from our website.
Over the next few weeks, we'll be spending time with family and friends, so we may take a little longer than usual to respond to support queries.
We have some very exciting plans for 2019, so stay tuned. Have a great Christmas and a wonderful end to the year!
Today, we released Alfred 3.7, which brings support for macOS Mojave.
Apple will be releasing macOS 10.14 Mojave on 24th September 2018, so be sure to update to Alfred 3.7, which is available from the Update tab in Alfred's preferences or from alfredapp.com.
Apple have made a number of changes to the granularity of permissions within macOS, which has led to a few changes in Alfred to keep your experience as smooth as possible.
Take a look at our Getting Started with macOS Mojave guide, for details of the permissions Alfred requires to smoothly integrate with macOS Mojave, as well as tips on setting up syncing on a newly installed Mac.
 Alfred celebrates his 8th birthday today, and we can hardly believe how time has flown!
In 2010, we released Alfred 0.4 to friends, and it's hard to believe that eight years later, our incredible community has grown to millions of users around the world.
If all Alfred users were to stand next to each other and hold hands, we'd make a line stretching at least... well, at least somewhere very far from where we started! ;)
In order to mark this milestone, we've decided to make a £5,000 charity donation, shared between Mind, a mental health charity here in the UK, and Emmaus, an international charity working to end homelessness. Every day, we're grateful to work in a warm office on beautiful software, surrounded by a friendly community. These charities aim to help individuals get the support they need to get back on their feet.
Don't forget that if you want to show off your love for Alfred, you can grab some stickers to slap onto your shiny Mac, a snazzy t-shirt or a mug to fill with productivity-boosting coffee on our Alfred online shop.
Whether you joined us in 2010 or only discovered Alfred yesterday, and whether you're simply using the free version or using Alfred's Powerpack superpowers, thank you for being part of this wonderful community! You keep amazing us with your clever workflows, your creative use of snippets and your gorgeous custom themes.
Alfred 3.6 was released yesterday, and brings improvements to the new Bookmarks feature, as well as to Snippets and Clipboard search, File Navigation, Workflows and more!
Improved Chrome Bookmarks Support
We've improved discovery of profiles in Chrome, and you can now choose a profile on each individual Mac (e.g. if you have a work and home Chrome profile).

The bookmarks search is now more flexible, so that words contained in the bookmark itself or its bookmarks folder are matched in any order.
Text Expansion, Snippets and Clipboard improvements
We've added a new Matching option to the Snippets and Text Expansion feature, allowing you to choose to include the contents of your snippets in the Snippet Viewer and from the Snippet keyword.
This option makes it easier to find the relevant snippet, even if you don't recall the name or keyword you've set for it. To use this broader search, enable it in Features > Snippets.

Toggling File Navigation Preview
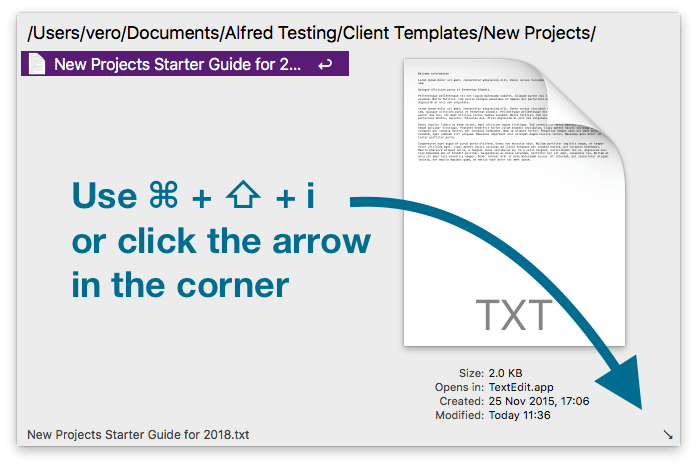
You can now collapse the right panel in the File System Navigation, allowing you to view longer file titles instead of previewing the file on the right.
While the full name of the selected file is shown at the bottom of the File Navigation window, it can sometimes be more convenient to see long titles for all files.

Use Cmd + Shift + i while File Navigation is showing, or click the arrow in the bottom right to show/hide the Preview panel.
A whole lot more improvements and fixes
As ever, there's more to this release than we can cover in this post, so take a look at the change log to see the full list of changes in this release.
It's been amazing hearing and seeing all of the ways Alfred has helped you boost your productivity, so if you're on Twitter, say hi at @alfredapp and share your favourite uses. :)


 Alfred celebrates his 8th birthday today, and we can hardly believe how time has flown!


